Monday, December 30, 2013

Compact Holborn Setup Update 2014!

Hey everyone! 

Sorry for the late post, but I have been dealing with some health issues and couldn't get this up before today! 

Since I posted my last setup some things have changed in my Holborn so I figured why not show you how I plan to setup 2014! 

When you open my Holborn the first thing you see is my cover page, which is behind a clear flyleaf. I also have a magnetic paper clip holding the two pages together simply because the clip is cute. Since the last time I showed you my setup I have added post-it notes to the flyleaf for making quick notes on the run. (I should mention that the pockets setup has not changed. I keep stickers, Martha Stewart dew drops, and note cards in them). 

My Cover Page

Behind my cover page is where I keep my Filofax registration number in case my planner was to ever go missing. I'd hate to lose my baby haha. 

I have the actual code covered. Just to be safe! :)


Following my registration page is my 2014 resolutions followed by a blank divider that came with my Holborn. This divider contains my month on two pages, however, I am considering purchasing the horizontal month on a page so that I can place them within my weekly pages at the beginning of each month. But for now I have a specific section for my month on two pages. 

This is the beginning of my resolutions list!

This is just a plain divider that came with the planner


On the note section that is at the beginning of the month on two pages I have my colour code written out. I typically remember this, however, in case I am having a stressful day I have them listed! 

This is my colour coding. If you read my previous blogs you will see how I highlight


On my month on two page view I colour in the days from the previous and following month, so there is no confusion and because it makes the pages pretty and colourful. :)

This is what I mean when I say I colour the days of the previous and following months!


At the end of my monthly diary section I have my university class schedule, in case I need it for reference for the first few weeks. 

This is my schedule for 2014! 


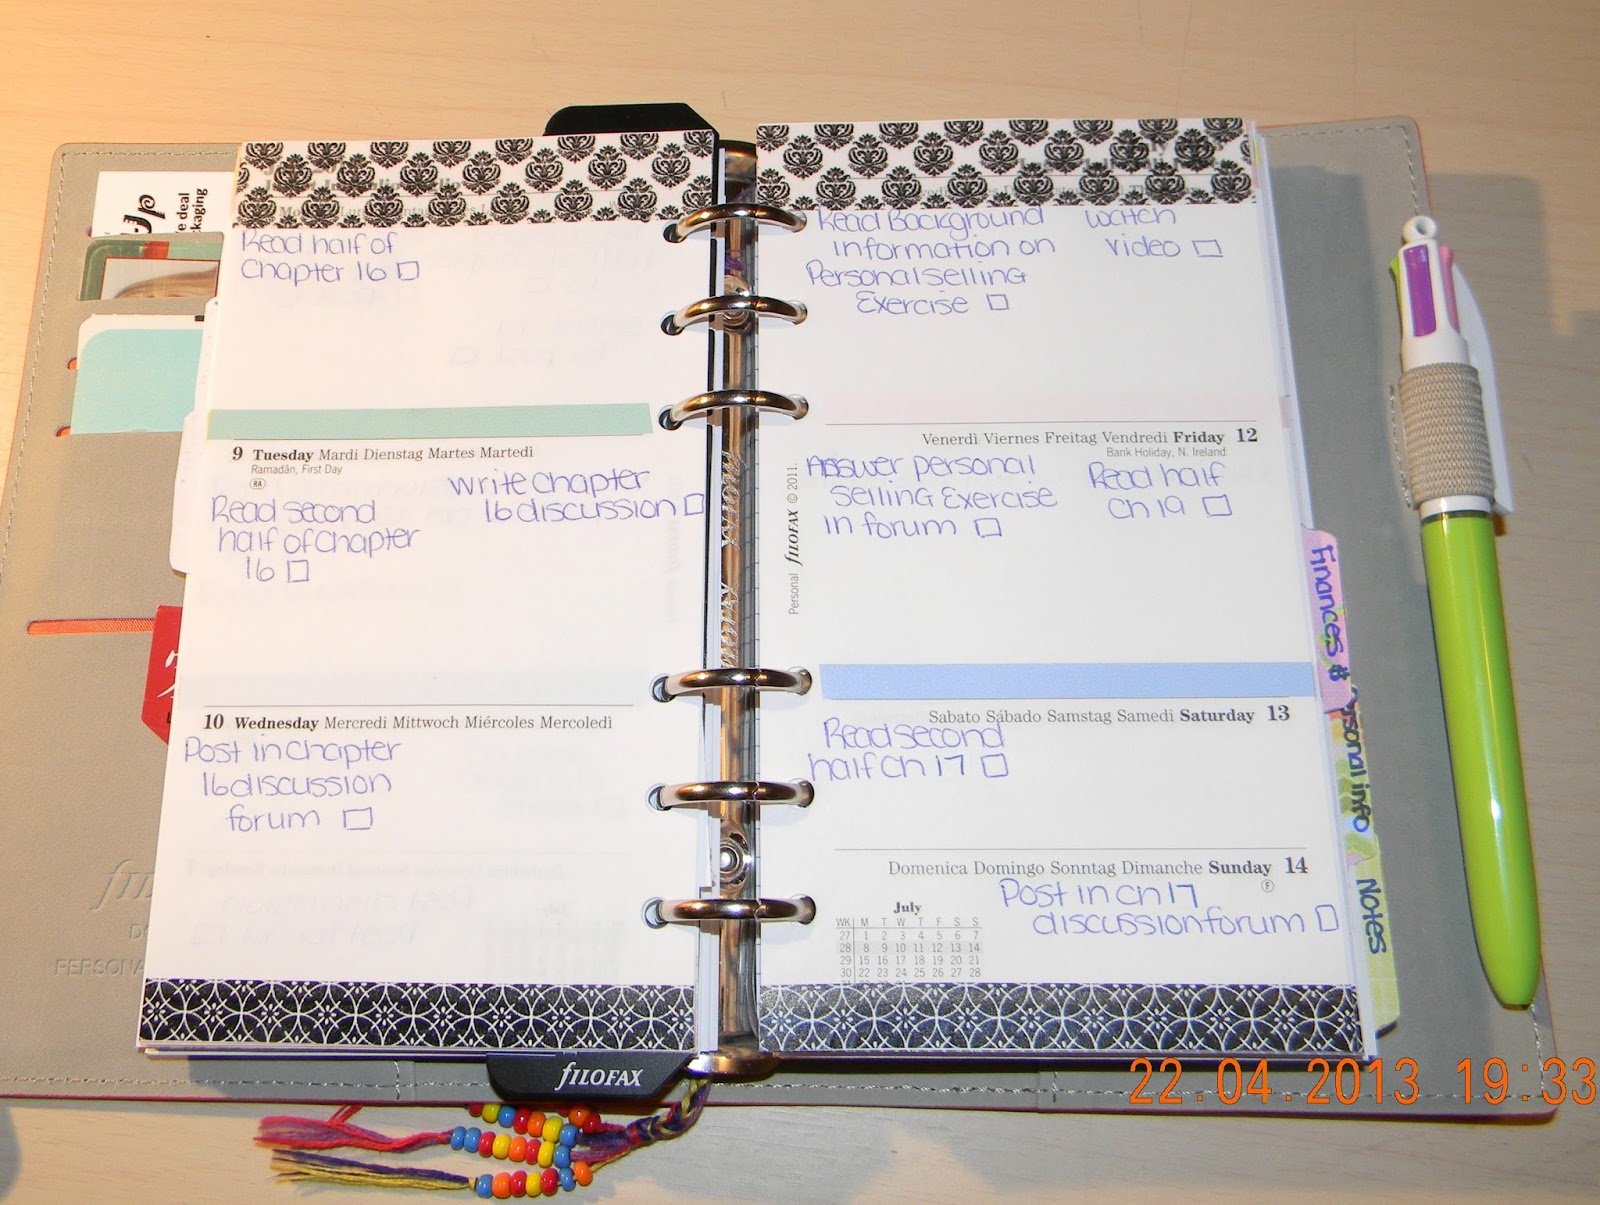
Next is another blank divider that came with the planner and this section contains my week on two pages (lined). I decided that this year I would try the lined pages. Hopefully it can help make my writing a little neater! 

Another divider

This is what the lined week on two pages looks like 


At the end of the weekly diary section I have a note card that I made with a list of the blog posts that I want to do.

I will be doing a post about how I make these. So if you are interested in that please follow my blog to keep updated!! :)


After this I have my last divider (again one that came with the planner). This section is somewhat a personal miscellaneous section. In here I keep things such as the courses I need to take for my degree, record of my grades, my personal information (of course), and some important notes and numbers that I may need to reference when away from home.

Just another plain divider 
The courses I need to take. I have my grades covered because I don't feel like sharing that much information with the world :)


At the very end of planner I have a top opening envelope that contains photos of my fiancé and my parents! The most important people in the world to me. (I am not going to insert a photo here for their privacy!)

I hope you all enjoyed and maybe got some ideas for your own planner from this post! If you enjoyed please follow me for updates and share this with your friends! Thank you so much for reading. Leave any questions or requests in the comments below.

Talk to you all later! 
Stephanie xo

Saturday, December 21, 2013

How I Use my Week on Two pages

Hello Everyone!

Today I thought I'd tell you about how I make use of my week on two page inserts, and the different ones I have tried!

I guess I will start by telling you what diary pages I have used. My first Filofax can with week on two pages (5 language) I really disliked these as the multiple languages took up way to much space! I know I could just white out the extra languages but I am SUPER picky about how my pages look and I find white out noticeable and tacky looking! (My uni notes will get completely rewrote if I have to use white out... it just bothers me... really I am just weird haha :).

So when I got my compact Holborn it came with the unlined week on two pages, which I liked however I cannot write straight to save my life, so I have decided for 2014 to go with the week on two pages with lines. Hopefully I like them better! I really wanted to try the week on two pages that run from Sunday to Saturday but they didn't come with lines... I guess if the lined week on two pages doesn't work out I will try those next!

Since I use a compact I can't afford to have many extra pages! So I tend to not keep a note section or a To Do section. Since I am a student and I don't really have that many appointments I use my week on two pages diary as a place to write any appointments, group meeting, and my To Do lists (which are typically reading assignments from the textbook and assignments!). For things like important dates, due dates, and exams I use my monthly pages! I have a previous post on that if you are interested.

This is an example of how I was using my week on two pages (unlined)

As you can see in the photo above I write in exams, dues dates, To do's, appointments, and notes of things that I did and want to reference the date I did them. 

To keep this organized and less confusing I use colour coding. Instead of highlighters I use colouring leads (I have a post on that as well if you want to check it out!). I am making some slight changes to my colour code for 2014 but pretty much I highlight most things except for To Dos for those you can see I highlighted the subject such as business 3700 and listed everything for that to do under it. 

If I were to have non-school related to dos I would also categorize them. For example: bills (which I would highlight) then list the bills I need to pay under it, errands (highlight heading) and list them, etc. 

This method won't work for everyone but I think it is definitely a great method for students to use and people who have a lot of to dos that are in different categories! 


The photo above is an example of how I mark holidays or birthdays, etc. That one is valentines so I outlined it in red and pink to make that day stand out! 

If I have other notes or something that I want to elaborate on in my weekly pages I just take one of my smash book note pages or my home made note cards write my note on there and insert it between the week pages. If you are interested in seeing what I use for that I have a post on that last week! 

Some suggestions for anyone trying to figure out how to organize their weekly pages:

  1. Use colour. Whether it is coloured pens or highlighters, or colouring leads. This helps make the information stand out and if you know your colour coding system than you can look at your pages and be able to get an immediate idea of what you have going on! 
  2. If you don't have many appointments and meetings use your weekly pages to write your to dos on. This will save you space in your planner and gives you an idea of what you need to complete that week!
  3. Find weekly pages that work for you! I have had to try a few different kinds and I am still not sure if I like the ones I have.
  4. Don't write too much information about each thing, use note cards or sticky notes to put in extra information or reminders that you won't need to keep after you complete the task. This not only declutters your pages, but it also saves space! 
As always thanks for reading and I hope you enjoyed! If you have any questions please leave them below. I try to respond to everyone who comments. Also if you would like weekly updates about my post please follow me on blogger, bloglovin', or through email! 

Talk to you next week!! :)
Stephanie xo

Saturday, December 14, 2013

Cheap and Easy Note Card Inserts

Hey everyone! 

I am back to today to tell you about a cute and simple way to make small note/ToDo card inserts for your Filofax. This seems to be pretty common with Filofaxer's on YouTube and a lot of you may already know this or use this idea. However, for those of you that don't here is a "DYI" insert idea! 

A big problem I find--and I am sure a lot of my fellow Filofax users find--is that you want to have the space of an A5 page to write on, but the portability of a compact or personal size. As a university student I have a lot of group projects and papers, which result in a lot of group meetings. I note these meeting on my week pages, however it would take too much space to also jot down everything I need to remember to bring or tell my group members at the meeting. 

So to solve this problem what I have done is taken Smash book pages and hole punch them. I keep these in one of the pockets in my planner and then if I need to make a note of something that I don't have space for on my weekly pages I will write it on there and put it in between the weekly pages. Another thing I do if I want more space to write than what the smash book pages provide me is I take a normal (3 x 5) blank index card and print lines on them (I also keep some of these in my planner pockets), I then hold punch them as well and can use either for notes and ToDo lists. I actually have my Blogs Ideas listed on a note card! 

Below are photos of some of the pages, the index cards, and what the cover of the smash book note pad looks like. I have also included an example using my Blog Ideas note card! 

This is an example of the smash book note pad cover. I got mine at Michaels craft store. There are a lot of different options to choose from! 

These are some of the pages from the smash book note pad that I keep in my planner. They are small so you can make a quick note or ToDo/To Bring list on them and stick it in between your weekly pages or even in front of your flyleaf! 

For bigger lists or more detailed notes I googled printable note paper, put the index cards in to my printer, and set the page size for 3 x 5. I printed double sided for these so I can keep ongoing lists such as my blog ideas list! 

This is an example of my Blog Ideas note card in my Filofax! I just highlight the ones I have done so that I know I completed them but can go back and look at what I have posted about and if it is ever a good time to do an update post! 
You can also do this with scrap paper you may have lying around your house, or scrapbooking paper, even paper bags or envelops! Just be creative and personalize your planner the way you like it.

I hope this was helpful to some people If you have any questions feel free to leave them in the comments! As always thank you so much for reading and if you want weekly updates please follow my blog!

Talk you later!
Stephanie xo

Saturday, December 7, 2013

Tips for Setting up a Filofax

Hey everyone! 

I am dying with the flu, so this might be a shorter post today... 

I wanted to give you guys some tips on setting up a new Filofax or rearranging a beloved old Filofax! So lets jump right in... 

To begin I think it is always a good idea to keep a flyleaf at the front of your Filofax because it helps keep the pages from getting bent or wrinkled. 

Following the flyleaf and cover page a lot of people seem to keep their personal information. I personally don't do this, because I don't feel as though that is the first thing I need to see. So, following my cover page is my registration number followed by my monthly diary section (of course there is a divider in between those!). 

Next, I like to keep my weekly diary section. The reason I keep these at the very front of the planner is because I feel they are the most important pages. Those sections are the main reason I use a planner. If you keep a separate section for ToDo lists I would put that in front of the diary section (personally I keep my ToDos on my weekly pages since I don't have many appointments, I use my Filofax to plan out school work and study schedules along with recording the few appointments or meeting I may have!). 

Following the diary section(s) I would keep any other planning sections, followed by any notes sections. I feel these would be better behind your diary section because you do not need to access that information as often. 

Last I would keep my personal information and contact information as these are sections you probably won't use as often. Personal information is more for the benefit of having your lost planner returned to you, or to note information that you may only need once in a while, and as for contacts most people only have that section as a back up incase their phone happens to die (heaven forbid lol). 

At the very back I like to keep a second flyleaf as I feel it keeps my back pages from getting so wrinkled and bent. If you haven't figured it out yet I am SUPER picky about how my planner looks! 

To summarize my point. I feel that it is important to keep the sections you use most often toward the front and work your way back to the least used. I think that this makes you more focused and productive

As for inserts such as top opening pockets and business card holders I would place them in based on what I am using them for and how often I access them. If the top opening pocket holds sticky notes and stickers I would consider putting it in the back as it is not something you need to see all the time, If you were to need a sticky note you would know where to go look for it. 

Hope this was helpful and made sense. Sorry for the poor quality this week. As I mentioned I am dying with the flu, but I didn't want to miss posting this week! Thank you as always for taking the time to read this, I really appreciate it! If you enjoy my posts please follow my blog for updates! 

Talk to you all later
Stephanie xo

Saturday, November 30, 2013

Month at a Glance... What's the point?!

A lot of people seem to feel one of two ways about month at a glance pages in their planners. Some people think "These are useless! I can't write anything here! The blocks are too small." while others love this view and cram in all of their information. 

Personally, I want these pages in my planner. Before I started using Filofax I would not buy a planner that did not have these pages! I think the important thing with month at a glance pages is that you need to be organized, focused, and consistent with them. 

Here are some tips on how I feel you can use month at a glance pages most efficiently:
  1. Colour code - this makes the information easier to distinguish. If you know your colour code really well you can tell what category each thing is in before you read them. 
  2. Only put in appointments, and due dates/important dates. Focusing these pages on just these things make them less cluttered and easier to read. 
  3. Something I like to do is colour in the blocks at the beginning and the end of each month that represent the previous and next month. This adds some decoration and colour to the page and also makes where the month begins and ends much easier to see. 
Here is a photo of how I make use of my Month at a Glance inserts:
You can see that my appointments are colour coded, and you can see how I coloured in the beginning and ending blocks that show the days of the previous and following month. Also I keep my page to a minimum when writing in dates. 

Hope this was helpful to some of you. Remember if you enjoy my blog please follow me through email or bloglovin' for weekly updates! Also remember to leave some requests for things you'd like me to write about! 

Talk to you next time,
Stephanie xo

Saturday, November 23, 2013

Pros and Cons of using a Compact Filofax

Hello Everyone! 


As some of you who read my blog may know, I recently purchased a Black Compact Holborn Filofax. As of right now I am completely in Love with it! 

So I thought today I would talk about what I feel are the pros and cons that go along with having a compact Filofax. Hopefully this will help anyone who is trying to decide whether or not a compact is for them!  

Lets jump in! ...

The Pros:

  1. Helps keep you super organized because it limits what you can store in it; therefore, you have to clean it out often! 
  2. It helps you really focus on planning without adding a pile of stuff that you never look at. 
  3. It is the perfect size to throw in your bag and take with you on the go. Not only is the size convenient, but because the rings are small you are forced to carry less making your planner lighter! 
  4. You can switch between a compact and personal on a regular basis without any fuss. Both take the same size refills so if at any point you feel like switching, just take out the pages and may a quick switch. No need for rewriting and reprinting everything on to different sized paper! 
  5. They work well as a wallet because of their small thin size. Who wants to carry around a super bulky binder as a wallet. 

The Cons:

  1. The small size restricts what you can put in the planner. This may be a bad thing for those who like to keep lists, calendars, cards, etc. in the planner. Basically for those who like to store their whole life in their Filofax :)
  2. The writing space is limited as it is in a personal as well. So if you write a lot go with an A5! 
That seems to be all I can come up with! The pros outweigh the cons in my opinion, and I can't imagine not using a compact in the future. I specifically love the Holborn because the leather feels so good! 

Remember these are just my opinions. If you feel differently, I respect that. Everyone is entitled to their own opinion. Also if anyone can think of any pros or cons that I haven't come up with please leave them in the comments for other to read. 

Thank you so much for taking the time to check out my blog. As always please follow me on bloglovin' or by email for future updates. I try to post once a week sometimes twice. I would really appreciate requests or suggestions for future posts! If you like this blog please share it with others! 

Thanks for reading! 
Stephanie xo

Tuesday, November 19, 2013

Alternatives to Highlighters!

If you are anything like me, you hate the bleed though that happens when you use highlighters on Filofax paper! 

People will say "why not try the gel highlighters? They work great!". I tried them and I really dislike the waxy feel of them :)

 **I was the kid who hated crayons and loved markers and leads.** 

So I had no idea what to do.. I like to color code my planner to a point, I don't like carrying many things with me, and only thin pens fit in the pen loop. Needless to say I was frustrated and disappointed! 

Then it hit me! Colouring leads!! They can let me "highlight" without bleed through or that waxy feel. 

So I got to work choosing colours to mean different things. For me, I have 3 classes so each have a color (entrepreneurship is green, accounting is blue, and information systems is purple) and then I use pink for any appointments or personal meetings

What I do when I want something I stand out like a doctors appointment or an exam I draw a box around it with the appropriate color lead and shade it in lightly. This draws my eye to it when I open the page. 

When I am making a todo list for class such as work on part of an assignment and read certain pages I will write the class number, draw a box around it & shade it in, then make my list underneath. 

So far this method is working for me really well! I am please with it. 

Here is an example from next week! The numbers are pages to read and take notes on for my classes. (The numbers are the the numbers for my classes). You can also see how I color an appointment on Sunday I coloured my dogs training class. 


Hope you all enjoyed reading this! Hope it helps those of you who have struggled with this like me!! 

If you like my blog please follow me on bloglovin' and share it with others. Also feel free to leave me requests! 

Talk to you soon. 
Stephanie xo

Sunday, November 17, 2013

Compact Holborn Setup!

Hey Everyone! 


Today's post is about how I have my Compact Holborn setup


To begin, this is what my Holborn looks like closed:


If you didn't read my Review Post, this planner is made of Buffalo Leather and smells/feels amazing! 


When first opening my compact Holborn you see the six card slots on the left. In these slots I keep two business cards and my Starbucks gold card. 

On the right side you see my fly leaf with  a smash book paper I hole punched. I use this card to keep information that I need more than once (such as the type of ink my printer takes). 


This is just a closer shot of the card slots for anyone who wants to know what they look like. 


Next I have a blank index card that I printed lines on and hold punched for making lists and keeping important information on. 


Following the index card is a divider I made using scrap book paper. This divider is used to mark where my monthly pages begin. 


Within my monthly calendar I use a today ruler from Filofax to mark what month it is. Sometimes, like this month, I decorate with Washi tape around the edges. 

Something I always do with my month pages is color in the days from the previous month that are shown on this month's page. You can see this at the top and bottom of this page. To colour these in I like to use coloured lead pencils!


Since a compact has smaller rings I am only using two dividers so as to take up less space. This second divider marks where my weekly calendar is. 


Like with my monthly calendar I use a today ruler here to mark the week I am on! As you can see there are two smash book cards that I use to put notes on (for things I need to remember). I do this so I don't take up to much space in my planner. 


Finally following my weekly on two page calendar I have two address pages for any important numbers I want just in case my phone was to die! I keep doctors numbers, the vets number, important numbers for school, etc. 


I hope you enjoyed my Compact Holborn setup ! Keep in mind their isn't all that much done with it because I have only had this Filofax since Wednesday. 

Follow me on Bloglovin' or by email so you can see when I post new blogs! I am trying to post every Sunday. Also there is a request form please feel free to leave me requests through there! 

Talk to you soon!
Stephanie xo


<a href="http://www.bloglovin.com/blog/11270673/?claim=dmjuyktbyx4">Follow my blog with Bloglovin</a>

Friday, November 15, 2013

Quick Update about Blog!! :) Please Read!!

Hi everyone!!

I am just getting use to blogging and I am aware that I have not been consistent with posting to this point. I was trying to come up with a solution for this and decided why not make a schedule!

So my plan is to post a blog each Sunday! Once I get use to blogging and come up with more ideas I plan to try to make at least two posts a week. I know this is not much but I really want to try and be consistent and post something that is worth reading rather than posting for the sake of writing a post!

I would love it you all would follow my blog and give me ideas on what you would like to read about.

Thanks!

Talk to you all soon,
Stephanie xo

Thursday, November 14, 2013

My Compact Holborn is Here!!

I am so excited after a 3 week wait my Black Compact Holborn has shown up!!!! Needless to say I am in LOVE!!! I will post a picture of it here and give a quick review. Keep in mind I will be making a separate post about my setup, so you won't see that here. That post is coming up next!

So here is my beautiful new baby!!


To begin, the leather on this planner is so soft and amazing! It also smells amazing (this is coming from someone who doesn't even like the smell of leather!). The rings had no defects, and the planner itself had no damage.

The ring size is much smaller than the personal size, however I am fine with this. I bought a compact size for this reason. Keep in mind this is probably not a good size for someone who likes to decorate and keep a lot of things in their Filofax!

The inside has 4 full size pockets two on the front and two on the back, as well as 6 card slots. (I will show all of this in my setup post). The ring size is ½" and the planner is made from natural grain Buffalo leather. It has a button closure that seems quite sturdy on my planner and a single pen loop located on the back cover, which is leather with a little bit of elastic (about a ¼ of the loop). It does not hold thick pens very well, and cannot fit my Bic Multicolour Fashion pen! I am just using a normal blue Bic pen.

I think it is important to note that this planner is not overly stiff. The covers are fairly flexible, however, not as flexible as a Malden. Some people may not like this if they do a lot of writing on their lap or other soft surface, but a quick fix for that is to put some stuff in the pockets to stabilize the covers more!

I found that out of the box the Holborn lies decently flat and I feel that over time it may flatten out even more!

Overall I think this planner is amazing and recommend it to anyone who is looking for a nice compact planner! The regular price for this planner is $85, but at the moment it is on sale for $42.50. If you have wanted this planner for a while I would say take advantage of this sale and get one while you can!! :)

I give this planner a 5 star rating! ☆☆☆☆☆

I have noticed that other Filofax owners like to give their planners names and I am trying to think of one for mine! If you have any suggestions please leave them in a comment below!

Keep an eye out for my setup blog!

I should also give credit to Nadine from Nadine's Mixed Plate on YouTube for inspiring me to buy Filofax! Love her! Check out her channel

Talk to you all later!!
Stephanie xoxo

Tuesday, October 29, 2013

Exciting News!

So I am super excited to tell you all that I have ordered a Compact Filofax Holborn and it should be here in the next two weeks! I will definitely be doing a post showing you the Filofax when I receive it and when I put my pages in it! So excited! Make sure you follow my blog for updates! :)

xoxo,
Stephanie

Sunday, August 25, 2013

Update

Hey everyone,

Sorry the Filofax blogs have been almost non-existent. I have not been using my Filofax much over the summer as I was not busy at all. When I begin to use it more I will post more blogs! However, if you have a specific request please leave a comment and let me know.

I also wanted to let everyone know that I have started a University/College blog. So if any of my readers are in University/College please go check that one out! There are lots of posts coming for that blog as I am starting back to school in about 9 days. The link is: http://xuniversitylifex.blogspot.ca/.

If you like my University blog please subscribe or add me on google+ so I can notify you when I have a new post!

Stephanie xo

Tuesday, June 25, 2013

Pen/Ink/Highlighter Review

This post is going to be about my opinion on a select few pens, highlighters, and ink pads on the regular Filofax paper that comes in the planner when you purchase it.

The pens I have tested include:
Le Pen

Bic Fashion Pen

Sharpie Fine Point Pen

Frixion 0.7

Hi Tecpoint V7 Grip (Blue)
    Papermate
The highlighters I tested include:
Papermate intro

Sharpie Accent (Smear Guard)

The ink pads I tested include:
Color Box pigment ink
  • I do not have a photo of the other ink but it is a craftsmart dye ink pad in black.

When I used these on the Filofax paper this is what they looked like: 

All pens wrote nicely on the paper. They all write smooth and the tips do not catch on the Filofax paper. 

The highlighters all highlighted smoothly and the color showed up well, however it is very noticeable where you start and stop because the paper holds the ink.

For the ink pads, both stamped evenly, and true to color. I did not have to touch up any spots where the ink missed.

When you flip the paper over this is what you see:

Looking at the back of the paper the Le Pen bleeds through the worst, followed by the sharpie and Hi Tecpoint V7 grip pens. The Papermate, Frixion, and Bic fashion pens do not bleed through the paper. 

As for the highlighters, all bleed through the paper and the start/stop points are extremely noticeable. 

The Craftsmart ink pad bleeds through the paper really bad, while the Colorbox pigment ink pad only shows a shadow that is hardly noticeable.
If I were to recommend pens, and highlighters for the Filofax I would suggest this:
  • If you do not color code the Papermate pen is wonderful. However, if you would like to color code the Bic fashion pen is excellent (has limited color choice) or the Frixion pens (erasable and have a wide variety  of colors). 
  • If you want to highlight I would not recommend highlighters but you could use the transparent page flags. 
Thank you for reading. If you like my blog please follow and share. Comment with any questions or requests below. 


Stephanie xo

Monday, June 10, 2013

Personal Domino Setup Update!

Hey Everyone! 

I know it has been a week or less since my last Filofax setup video!! But like I said then it will probably change many times! The changes I made are not huge changes but there are enough of them to make a new post about! Hope you enjoy!!

First, I added a "charm" to it.. its an old braided bookmark that was lying around my house. I thought the colors went perfectly with the color of my Filofax!!


The next change I made was to the monthly calendars! I had the vertical month on two pages and really didn't like them so I ordered new ones! They finally showed up yesterday! 


Next, I thought I would show how I have decorated a little further into my weekly diary!


In both of these photos I have used recollections washi tape from Michaels! Sometimes I also add stamps but I want to get a new ink pad because the one I have right now bleeds through the page too much!

The biggest change that I have made with my Domino is the notes section! Last time I had this section organized by the A-Z dividers. I found I did not overly like that method it made it hard to find things sometimes when I could remember what I titled the note. For example, my degree plan for school I could never remember if it was under B for business or D for degree. 

To solve my problem I made sections and put sticky tabs at the top of them to mark them! This way I can file my notes by category rather than name. 


My first section under notes is University. Here I keep things such as:
  • Grades
  • My degree plan
  • Professor information
  • Class information
  • Important school information
  • Schedules 

Following this section I have a section called wish lists. In this section I keep things such as:
  • Shopping lists
  • Reading list
  • Filofax wish list
Next I have a tab for goals. I think that category is self explanatory :)


This is a Goal planning page that I printed and cut to size from www.theprojectgirl,.com
Following Goals is my inspirations category. In here I keep:
  • Quotes that inspire me
  • Magazine clippings
  • Articles

This is an example of an inspirational list that I found 


Next I have Miscellaneous. This is where I keep anything that does not fall into my other categories! So I have a list of good websites, a page with a piece of each washi tape I own (to keep track),  random sticky notes that I no longer need in the front of my planner also get stored in this tab.


Following that I have a tab for my blog and a tab for my YouTube channel! This is where I keep lists of requests or ideas. I also keep the questions for tag that I may do or make notes of what I want to talk about. 


That is all the changes I made to my Filofax as of now. If you have any suggestions, questions, or comments please leave them!

Also check out my YouTube channel:  http://www.youtube.com/user/xStephanieEmmilinex

Thanks for reading!!
Stephanie xo. <3