Hey everyone,
Its been a while since I last made a post. Sorry about that, but I found myself in a Filofax slump... I have been trying to love my Malden, but I just can't seem to bond with it. Because of this I have kind of stopped using it. On the bright side I have ordered a personal Raspberry Finsbury, which I am excited to receive! I will have more post coming up soon! I will also make a post about why I did not like the Malden!
As always thank you for reading!
Stephanie xo
Tuesday, September 23, 2014
Friday, September 5, 2014
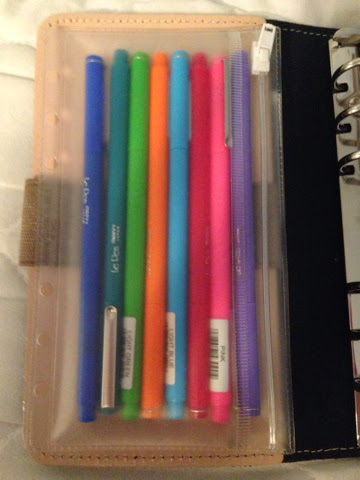
Color Coding... My Favorite Pens!
Hello Everyone!!


Like most people who use a Filofax I love to colour code! I can sometimes go overboard with it so I have limited myself to just a few colours (this saves having a long list of colours to memorize and saves space in my planner!!).
When I first got a Filofax I used the bic fashion pen that a lot of people rave about. Its a great pen and is really handy for saving space, however I just cannot write neat with them! The barrel of those pens are too big for me... So I decided to try Le Pens (there is also a recollections brand (I think thats the brand) at Michael's that is basically the same). These pens are great because they come in a wide range of colours and are really slim so they don't take up much space.
Warning: if you are a person who hates bleed through and are using the Filofax inserts these pens are not for you! I learned this the hard way!! I have inserts from Piaric which are amazing. You can click Here to read my review of these inserts. Piaric inserts are on a thicker paper than the Filofax brand and with Le Pens there is literally no bleed through.
I love that these pens have a fine tip, are thin so they fix in basically all pen loops. and have large selection of colours. If however, you don't like how thin these are, how fine they write, or just don't have them available near you a nice alternative is the Papermate Flair pens! These pens have a thicker tip and write really nice as well!
As always thank you for reading. If you like this post please follow and share with friends! Also feel free to share your favourite pens below. I would love to know what you guys use!
Stephanie xo
Friday, August 29, 2014
How I Use: Sticky Tags or Page Flags
Hey everyone.
As you can tell from the title I am going to be telling you about how I use my pages flags in my Filofax. For me I have two different types of page flags I use. The post it brand that look like an arrow and a cheap pack from the dollar store (both shown below).
Both of these page flags have a different use in my Filofax. The post it brand is used to actually mark pages like it is designed to do. I use these for this purpose because they have an arrow shape to bring my attention to certain things. I really dislike using the dollar store brand for this for the simple fact that they are just solid colours.

I felt like the dollar store flags were being wasted and I had bought quiet a few packs, so I came up with a new way to use them. I designated certain colours to certain things (for example: red = exams). I then write things on them, such as an exam date, and stick them on the correct date in my weekly inserts.


I find this useful for many reasons. I am a little OCD when it comes to my pages looking tidy. So I cannot stand scratching things out or crossing them off! So since an assignment due date or a doctors appointment can change I write them on these and stick them to the day. If for some reason the date is change I can just peel it off and move it to another date.
Not only does this make moving things a lot simpler, but it also looks cute.
This method is also great for tasks that you want to complete but may not get done on a particular day. You could write them on these and move them throughout your pages until they get completed!
As always thanks for reading! If you liked this post please follow and share with friends! Hope this tip helped someone. Feel free to leave your own tips in the comments below I love having new ideas to try out!
Stephanie xo
Friday, August 22, 2014
Buying Experience: My Personal Ochre Malden
Hey everyone!
Today I am going to do a review of my new personal Ochre Malden. I had wanted a Malden for a long while and could never find one within my budget as they were all sold out in Canada/US and the only place I could find them were in the UK. Ordering from the UK or buying from a UK seller would have cost a lot more than I wanted to spend. So eventually I found one on the FaceBook page Filofaxes and Pens for Sale. The seller was in Canada and the price was only two dollars more then I would have paid on the Filofax US site with shipping! So of course I bought it immediately.
When my Malden first arrived I was extremely disappointed in how it was packaged! It was literally wrapped in a brown paper bag no stuffing or padding and I immediately thought "this planner is going to be severely damaged". But to my surprise it was in excellent condition (as in not scratched or dented/broken rings, etc.)! Then when I picked it up it was extremely dry and starting to crack in places. I was not at all happy with the leather or the smell... It was really disappointing.
I brought it home did some research online and got the idea to use a leather condition (the one that came with my leather sofa) on my Malden. I used that and noticed a significant difference in the feel and smell, but it was still kind of dry. So on the spots that were still dry I tried a small amount of Nivea hand cream. I didn't put it directly on the planner (terrified I would ruin it) but I put a small amount on my hands and lightly rubbed it in leaving my hands with that "greasy" feeling. I then took my Malden and rubbed my hands on the dry spots in circular motions. I let my Malden sit over night and the next morning the difference in the leather was amazing.
I am now completely in love with this planner and can't imagine not having it! I am going to be doing a review of this planner soon so stay tuned for that! When buying a Filofax I recommend you be extra careful! If you are going to buy from a seller like I did I would recommend asking about how they are going to package it, or if they can put in padding and something to protect the rings.
As always thanks for reading! If you liked this post follow and share with friends! Leave your experiences with buying used planners online below!! My post next week will be about how I use my page flags/sticky tags in my diary pages.
Stephanie xo
Thursday, August 14, 2014
Exciting News
Hey Everyone!
Sorry for being gone so long. I have just finished finals at Uni and was just too busy with that to post! I am on summer break now for a few weeks so hopefully I can get more posts out to you! Last blog post was talking about my new original that I had to send back for repairs... well that didn't happen! Instead I decided to get a refund. I had found a beautiful planner on the FaceBook page: Filofaxes and Pens for Sale.
I have been wanting a Malden since I first discovered Filofax on YouTube, and finally two years later I got my hands on one for a really good price. I am completely in love with this planner and think I have found my long term Filofax! I cannot imagine myself moving out of this planner anytime in the near future! My Malden arrived yesterday August 14th and it is a personal sized in the colour ochre.
When I first unwrapped the packaging I was slightly disappointed because as I picked up the planner the leather felt really dry and look really cracked. It didn't smell much like leather, it smelled like it had come from someone else's home (which of course it did). So my first reaction was I wasted my money... But then I started thinking there has to be some way to fix this. So I got online and searched for ways to condition leather. I came across one YouTube video and the woman said she used a shoe and a car leather conditioner. So I dug out the conditioning cloths for my leather couch. Tested it on the inside of the closure strap. It didn't cause any discolouration so I used the two step wipes all over the Malden and since I have done that I cannot believe the difference in how it feels! My Malden now feels and smells exactly how I had imagined it would. So there is a little tip for anyone who gets a Malden and is disappointed with how it feels!
Below I am going to insert some photos, I can do a setup if anyone really wants to see it but basically it is just the same as my domino setup.


Note: In the photos the picture of the front is the most accurate representation of the colour out of the three photos.
As always thank you so much for reading. If you have any questions, comments, or requests please leave them in the comments. If you enjoyed this post please follow and share it with friends! I'll talk to you all next time!
Stephanie xo
Thursday, July 17, 2014
Patent Original Nude Unboxing
Hey everyone!
Finally! My new Filofax has arrived. I took lots of photos so that you could see from when it arrive until I had it completely out of the packaging. I have to say I really like this planner, the only problem I have is that there is a very minor gap in the top ring, which I am worried will worsen over time. I have notified Filofax and they have offered to fix or replace the rings :)

I have ordered two other Filofaxes (my Holborn and a pocket Chameleon for my mom) in the past, I had purchased my Domino in a store in Florida. So I am basically comparing the shipping of this one to the two I ordered. I feel as though the box my Original was delivered in was much bigger than either of the others I ordered, inside the box however was packed the same way.

The downside to this one is that it didn't come in a Filofax box, which my other two did. I feel the packaging is what made the difference in the rings. As you can see in the photo below the "box" that the Filofax was in was crushed when I opened the package. I feel as though this may have contributed to the damaged top ring, since the box was damaged on the top where the rings are.


Shipping time was great. When I ordered it I was told that the planner was on backorder so I had to wait two or three weeks before it would ship, which sucked. But once I was informed they shipping the Filofax (on a friday) it was at my door the following Thursday.
So as you can see I ordered the Patent Nude Original in Personal size. I really do like this planner, although it is going to take sometime to get use to. It feels and smells good. I was expecting it to feel more like plastic, I guess because it is shiny patent material, but it doesn't.


The clasp feels really sturdy and the strap is the new longer version, so I have no trouble closing it.

I think what it going to take time to adjust to is that the pockets are not very stretchy as it is made completely from leather, so I can't fit as many extras in it as I could with the domino. I have really cut down on what I am carrying. But I'm not really concerned about it. I'm my opinion it made me really look at what I was carrying and pick the things I actually use!

The ring size is the same as the Domino and can hold a large amount. I don't use the pen holders because I use Le Pens and there are too many! So I just carry my Le Pens in a Filofax zip pouch. I don't attach the pouch to the rings, I just place it inside the cover before I close the planner. This works fine for me since it is the same set up as my Domino.
Overall. I think if you are considering purchasing an Original you should definitely get one as long as you're not someone who likes to pack their planner with accessories. If you are one of those people you may struggle with the amount of storage this planner provides, as it is very limited!
As always thank you for taking the time to read my blog! If you like it please follow and share with friends! I'll be back soon with another post! Until then happy Filofaxing and enjoy your summer! :)
Stephanie xo
Thursday, July 10, 2014
Piaric Inserts Review
Hey Everyone!
I am so excited! I checked the mail today and my Piaric inserts arrived. They are amazing, and to be honest I don't think I will be ordering inserts from any other company. I ordered the Month on two pages, Week on two pages, and lined/blank paper. I had no intention of doing a review of these inserts, but when I began setting up my planner with them I knew I had to tell you guys about them.
The inserts were packaged so cute!


The paper these inserts are made from is super thick. I can write on them with Le Pens as well as Papermate Flair pens, with no bleed through (there is a slight shadow from the other side but nothing that serious (I am very picky about bleed through)!
Using these inserts I have not once felt as though I can not use my favourite pens, which was a big issue I had with other inserts I tried. The only thing that seems to bleed with this paper is Memento ink. I tried this out with my stamps and it shows through more than other inks. You may not have a problem with it, but I am really picky.
Here is a photo of my le Pens, Papermate Flair, and a black sharpie permanent marker. The only thing that shows through the back of these inserts is the permanent marker.


Here is a photo of the inks I own and also something printed on the paper from my printer! The Memento ink have pretty dark shadowing but do NOT bleed through. I hate shadowing so I don't use them in my planner much, but if that doesn't bother you these inserts work well with them. Also you can print on them from your printer and it does show through!


You can purchase these inserts on Facebook, just search Piaric. She has many great options, and is will to make some customizations to the inserts if requested. I think her prices are wonderful and shipping is not expensive. I had mine shipped to Canada for somewhere around $2.50 !
If you are looking for excellent quality paper (that looks and feels great) and good prices check her out!
As always thank you for taking the time to read this post. If you liked it please follow and share with friends! If any of you have tried these inserts tell me about your experience with them.
Stephanie xo
Using these inserts I have not once felt as though I can not use my favourite pens, which was a big issue I had with other inserts I tried. The only thing that seems to bleed with this paper is Memento ink. I tried this out with my stamps and it shows through more than other inks. You may not have a problem with it, but I am really picky.
Here is a photo of my le Pens, Papermate Flair, and a black sharpie permanent marker. The only thing that shows through the back of these inserts is the permanent marker.
Here is a photo of the inks I own and also something printed on the paper from my printer! The Memento ink have pretty dark shadowing but do NOT bleed through. I hate shadowing so I don't use them in my planner much, but if that doesn't bother you these inserts work well with them. Also you can print on them from your printer and it does show through!
You can purchase these inserts on Facebook, just search Piaric. She has many great options, and is will to make some customizations to the inserts if requested. I think her prices are wonderful and shipping is not expensive. I had mine shipped to Canada for somewhere around $2.50 !
If you are looking for excellent quality paper (that looks and feels great) and good prices check her out!
As always thank you for taking the time to read this post. If you liked it please follow and share with friends! If any of you have tried these inserts tell me about your experience with them.
Stephanie xo
Monday, June 30, 2014
Personal Domino Series: Part 3
Hey everyone!
Today I am going to cover the last three sections of my Filofax. The reason I am doing it this way is because section four and five are really nothing yet...
Section four was originally a section for lists, such as household cleaning list, shopping list, etc. However, I realized this was pointless since I had a section in notes where I was keeping the same information. So as of right now section four has nothing in it. As of right now I am thinking about using this section for university (and taking that section out of my notes in the back) or maybe us it as a "gratitude journal" basically each day write down three positive things. Not 100% sure on this yet!
Section five is especially boring as it is being used for extra paper... How exciting haha! I am also thinking about changing this section and maybe switching a note section to there and the blank paper to the back.. Another idea I had was use section four for university and than make section five my expenses or something else. Right now these sections are really useless!
Section six has become my notes section. Originally I used the A-Z tabs here as a filing system for my notes. If any one is considering doing that it is really useful! I only changed it because I found all the dividers were making my planner unnecessarily bulky. So to save space I replaced the dividers with regular paper and stuck page tabs on them. This significantly reduced the bulk in my planner. I still do a table of contents on each "divider" so I know what is in there and in what order. I find doing this really makes finding information I need quicker.

My notes section contains nine subsections, which may become smaller if I decide to move some to the other two sections. But as of right now my subsections include:
- Important Information
- In here I keep things such as the type of ink my printer takes, personal information such as card #, insurance #, doctors # and addresses, vet information for my dogs, etc.
- Blog
- Here I keep lists of ideas for my blog, if anyone has any suggestions of other blog related things I can store in here let me know. Haha. I feel it is quite empty.
- University
- This category contains information about my professors, my grades for the current courses, the grades for each term, list of courses I need to complete for my degree and any other relevant information.
- Household
- In this section I keep a list of the chores we need to complete weekly or monthly, a list of the foods we like so I can jot down shopping lists as we run out, and anything else related to our home.
- Shopping
- Which contains a list of things I have ordered with tracking numbers if they are supplied, things I want to buy or need to buy
- Health and Fitness
- Here I have exercises, food information, weight tracking, etc.
- Lists
- I currently have nothing in here and I am thinking about removing it as I feel it is unnecessary for me
- Receipts
- This is where I keep receipts for anything that may need to go back, has warranty, etc.
- Other
- This category is designed to catch any notes that don't fit into the other categories!
That is the conclusion of my setup! As always thanks for reading. If you like this blog please follow and share! I will be doing a review of my Piaric inserts next, as well as an unboxing of my new Patent Nude Original when it arrives!
Stephanie xo
Monday, June 23, 2014
Personal Domino Setup Series: Part 2
Hello everyone!
I'm back with section two and three of my planner! This is the most used section of my Domino since it contains my monthly and weekly diary pages! So lets just jump right in.
Section two is my monthly planning section. For this section I am using the month on two page (SNR) inserts from Piaric. These planner pages are amazing! I will not purchase from anyone other than Piaric from now on. Anyway that is for another post, I plan to do a review of those pages separately! So stay tuned for that :)
Section two is sort of plain. I don't really decorate my pages with washi tape or stickers anymore (don't get me wrong I think it looks amazing but not when I do it haha). I love the look of my inserts and I kind of like how plain they are. My coloured pens and the stamps I use on them definitely make my pages decorative enough for me.
When you open this section the first page is just the Piaric 2014 Monthly Planner cover page.


I got these inserts the second week into June so the months before are blank. I use these pages for things such as due dates, exams/quizzes, appointments, meetings, and some birthdays.
Basically I check these at the beginning of the week to see what I have coming up for the next two weeks. The colour coding on these pages match the colour coding on my weekly pages. The clear page in between is something that came in a index card box as a divider I just hole punched it and put some washi at the top to make it easier to find the month I am on. I could have used one of my extra Filofax rulers but I found this was much less bulkier.

On my monthly pages I am starting to try using a stamp such as a heart shaped check box or a star shaped one to mark important days. The only other stamps I would use here is to bring my attention to that day such as the no school stamp.

At the end of this section I have a colour code page for my page flags. I write things that the date may change for (like when an assignment is due at school) on these. That way if these things change I can move the flag and not have to mess up my planner pages with scratches and white out, etc. On the back of this page there is a colour code for my Martha Stewart dew drops but I don't find I am using them as much lately. So I need to get back in to doing that.


Section three is my weekly planning pages. This is the section I spend the majority of the time looking at. Sometimes I use the individual check boxes for each item I need to complete (especially on days that are busier because the actual list it stamp would take up too much of the day. However, on a day where I only have five or six things to do I love to use the actually list stamp. All the stamps used in this planner are from Studio L2E. Seriously my favourite stamps ever. I can't figure out how I managed without them haha, since now I reach for them every time I am planning out my day or week.

In this photo you can see how I make use of the sticky flags and the individual to do check box stamps. I also tried out the hydrate stamp, but I didn't get into using this until two weeks later.

For the week of June 16 to 22 I really began to experiment with the stamp set (this was the first full week I had the set). Here you can see that I tried out the individual check boxes, which you can see work well for days like the 16th. On the 20th since I didn't need to write too much I tried out the list stamp, which I love. This is also the week that I really used the hydrate stamp.

This week is mostly a break from school so there is not much done with it yet. I just put a list of things to get done over my break and used my hydrate stamp. Since I am using the personal size I was thinking of maybe putting a journaling card in between the weeks to record my water intake for the week if I find the stamp is getting in the way of writing, but for now I think I will be sticking with this!

Also the Today bookmark is from Daytimer in case anyone was wondering.
So that is all for this post. I will be back with my other sections in a few days. Also I am planning on doing a review of the Piaric inserts, and I will also do an unboxing of my new personal size PATENT NUDE ORIGINAL when it arrives!!! SO EXCITED!!! As always thank you so much for reading, if you liked this post please follow and share with friends!
Also I mentioned my Studio L2E stamps above if you would like to read my post about them click here. If you missed part one of my setup click here.
Stephanie xo
Thursday, June 19, 2014
Personal Domino Setup Series: Part 1
Hello Everyone!
Todays post is going to be the first post of my setup series. This series will consist of six parts because I want to be able to give a bit of detail about each section, and if I was to do a post on the entire planner this would be ridiculously long!
This post is going to look at what I have in the front pockets of my Filofax, my zip pouch, and section one.
I guess I should get the easy part out of the way first... So below is a photo of my zip pouch (purchased from Filofax) in here I keep my Le Pens. I am going to do a separate post about the Le Pens. These are the pens I use to colour code in my planner, which I will talk more about in a later post as well! I don't clip the pouch into the rings because the pens in it make the domino too bulky. If you have a planner with a soft leather cover this may not be such an issue, however the domino's cover does not give at all so having the pouch in the rings really stretches the elastic closure.

Next, are the card slots on the front cover. In these I store various items (not all are useful when using my planner. In the top slot I have a business card and some page markers incase I need one. These page markers are from the Smash Book line at Michaels. They are really cute but they don't hold many pages!
In the second and third slot I keep two tickets. These are from events that I went to and really enjoyed. I keep these in the planner just for safe keeping and because they remind me of fun times with family and friends!
The fourth pocket is actually useful for my planner. In this slot I keep my Martha Stewart Dew Drops. These are removable stickers that you can write things on and then move them from week to week as needed. You can find this line at Staples (I am not sure if any other companies carry the brand). These are good for reoccurring tasks that you do not want to rewrite each week. Keep in mind the stickiness of these eventually wears off and you will have to make a new one, but this is still less work than rewriting the task each week!


The Domino comes with a large vertical pocket behind the card slots. This pocket is fairly flexible considering the stiff cover the Domino has. I don't keep much in here, just a few essentials. The first thing I keep in this pocket is a page of sticky tags. I live in Canada and purchased them at a store called Dollarama (not sure if this exists in the U.S). As you will see in a later section I use these on my weekly pages. The only other thing that I keep in that pocket are some journaling cards from the brand Smash Book. I also use these throughout the planner (mainly in the weekly section).


At the front of my planner I have a flyleaf (from Filofax), and behind this I keep a table of contents. The reason I do this is because I don't have a label maker and my tabs are not labeled. So I made a page that shows me what is behind each section. However, I may change this soon since I now have the tabs memorized. The colours on this page mean nothing, they are purely there to make the page look nice.

Following the table of contents, I have my registration number incase I ever lose my planner. I depend on this so much! I don't think I could live without it!! Haha kind of sad I guess, but I'm sure all you Filofax lovers understand! Also I put a tab at the bottom that is labeled "If Found..." Hopefully if someone found this they would look there!

Now we come to section one. For this divider I ran it through the printer and put a cute quote on it (I have this done with all my tabs). This section is "Frequently Used Information". In this section you will find personal information, summer class schedule (for university), a list of birthdays, 2014 - 2016 year at a glance calendar (some of these pages are daytime), a 2014 fold out year page, and professors information.


This section wasn't very interesting but I promise they get better!! I hope you enjoyed this post. Thanks for reading! If you liked this please follow and share with friends. Section two will be out sometime next week.
Stephanie xo
Friday, June 13, 2014
Studio L2E Stamps
Hey Everyone,
My Studio L2E stamps have arrived!! So excited. Absolutely LOVE them!
I ordered them on May 26th and they arrived on June 11th. Which is pretty quick considering I live in Canada and they had to get through customs. Pleased with the shipping time. The stamps were packaged really nice, and I absolutely love both sets I ordered!
I ordered two sets:
- Plan it
- List it: Kawaii
The plan it set has a lot of words that are really useful for everyday life. You can see a detailed view of what stamps it comes with in the photo below:


One of my favourite things about the plan it set is that it comes with a hydrate stamp to track your water intake, there is a pre made to do list, and some symbols such as a tooth to represent dentist.
The list it: Kawaii set, is super cute a gives you more options for making to do lists! I love how this one has separate sets of lines and check boxes so you can set it up how you want and mix & match. It also allows you to make lists without lines and provides both already filled in "boxes" and ones that are not filled in so you can check them off. Note that I use the word boxes loosely since they are not boxes. Instead they are really cute flowers and bears! Again you can see a better view in the photo below.


If you are looking for useful planner stamps I would totally recommend checking these out. I am in no way sponsored by this company and they have no idea I am even writing this! I just LOVE the product I received and feel like I should share this with other people. Although I am sure a lot of you have hear of this company before.
As always thank you for reading. If you like this blog please follow and share it with your friends! I will be doing a post about my new Piaric inserts when they arrive and shortly after that I will post about my new setup with those!
Stephanie xo
Subscribe to:
Comments (Atom)